Replacing Your Dryer Vent Hose: A Step-by-Step Guide to a Safer and More Efficient Dryer
Your dryer’s vent hose is a crucial but often overlooked component. Over time, the vent hose can become crushed, filled with lint, or disconnected, creating serious fire and health hazards. Replacing an old, damaged, or poorly connected dryer vent hose improves safety, boosts your dryer’s efficiency, and saves energy.
Why Replace Your Dryer Vent Hose?
There are two main reasons you should replace your dryer vent hose: fire safety and energy efficiency.
Fire Hazards
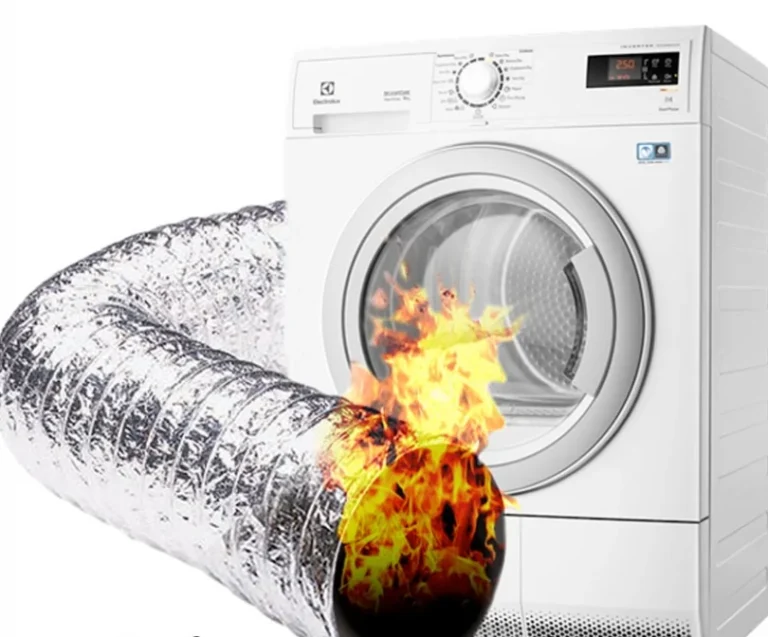
Lint can build up inside the dryer and vent over time. Lint is highly flammable, and a lint-clogged hose is a serious fire hazard. The leading cause of home clothes dryer fires is failure to clean them properly. Replacing your vent hose removes built up lint, reducing the chance of a dryer fire.
Dryer vents can also disconnect and fill with lint. If the vent becomes crushed or kinked, airflow is restricted. This allows lint to accumulate, creating a fire risk. Replacing a damaged vent hose helps prevent this dangerous situation.
Using foil or plastic vent hoses increases the fire risk even more. Foil hoses tear easily, allowing lint buildup. Plastic hoses can melt or burn. Always use a rigid metal vent hose for maximum safety.
Energy Efficiency
Restricted airflow makes your dryer work harder to push air through the system. This uses more energy over time, increasing utility bills and drying times. Replacing a crushed or clogged vent hose improves airflow so your dryer runs more efficiently.
Long vent hoses allow more air to escape, wasting energy. Excess lint in the hose also reduces airflow. Replacing an overly long or lint-filled hose with a shorter, cleaner one improves efficiency.
Finally, using rigid metal venting rather than foil or plastic provides maximum airflow. This enables your dryer to run at top efficiency, saving energy.
How to Replace Your Dryer Vent Hose
Replacing a dryer vent hose is a straightforward project you can likely do yourself in about an hour. Here are the steps:
Tools Needed
You will need the following tools:
- Screwdriver or pliers
- New dryer vent hose (preferably rigid metal)
- Hose clamps or foil tape
- Pipe straps
- Drill with 1/8 inch drill bit (if installing new wall outlet)
Removing the Old Hose
First, you need to remove the old vent hose:
- Unplug the dryer and pull it away from the wall. This gives you access to the back panel and vent hose.
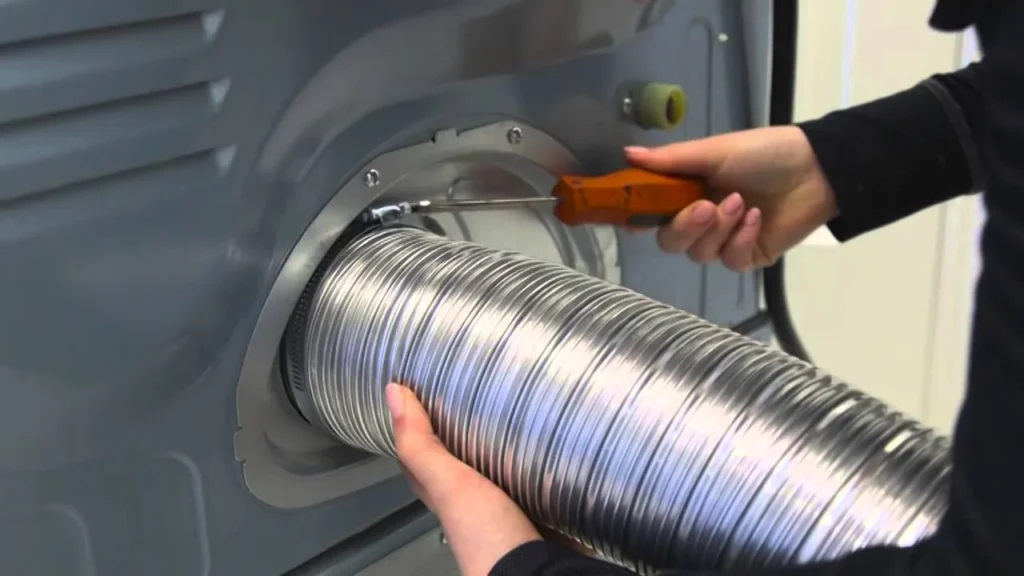
- Remove the old vent hose from both the dryer and the wall vent using a screwdriver or pliers. Twist the hose while pulling back to detach it.
- Inspect the wall vent and remove any lint buildup. Vacuum the vent if needed.
- Also check the dryer exhaust port and vacuum any lint from the port and surrounding area.
Installing the New Hose
Next, install the new rigid metal vent hose:
- Slide one end of the new vent hose onto the dryer’s exhaust port. Secure it with a tight hose clamp or foil tape.
- Run the hose to the wall vent, cutting it to the proper length to avoid sagging.
- Slide the other end over the wall vent pipe or hood and secure it with a clamp.
- For a new wall vent installation, cut a 4-inch hole in the wall. Insert a new wall vent fitting and secure with screws.
Securing the Hose
It’s crucial to secure the vent hose properly to prevent sagging, kinks, and disconnections:
- Use metal pipe straps to attach the hose to the wall studs or baseboard. Place a strap every 2-3 feet.
- Ensure the hose runs to the vent in as straight a line as possible, without dips or sags.
- Tighten all clamps and attachments so the hose is firmly secured at both ends.
Testing the Dryer
The final step is confirming proper operation:
- Push the dryer back into position and plug it back in.
- Run the dryer empty on high heat for 5-10 minutes to verify strong airflow.
- Feel outside the vent hood to confirm hot air is being pushed through.
- If airflow feels weak, check for kinks or tight bends in the hose.
- Also confirm all connections are tight. Adjust as needed to maximize airflow.
Proper dryer venting is essential for efficient, safe operation. By replacing your vent hose regularly, you improve safety, boost efficiency, and extend your appliance’s lifespan. Follow these steps carefully, using high quality rigid metal venting, for reliable performance.
Choosing the Right Vent Hose
The vent hose material you use really matters when it comes to safety and efficiency. Here’s how the main types compare:
| Vent Hose Type | Pros | Cons |
| Rigid Metal | Most durable, maximizes airflow, reduces fire risk | More expensive, tough to install around corners |
| Flexible Metal | Durable, allows some bending | Can kink and restrict airflow |
| Foil | Cheap, flexible | Tears easily, fire risk from lint buildup |
| Plastic | Inexpensive | Melts easily, serious fire hazard |
In my experience, rigid metal venting is 100% the way to go. The extra cost is worth it for the safety and performance. Make sure to get UL-approved venting. Flexible metal is okay for short runs if you absolutely can’t use rigid. But avoid foil or plastic at all costs. The safety risk just isn’t worth the small savings.
Step-by-Step Installation
Replacing the vent hose isn’t too hard if you follow good step-by-step procedures. Here’s how I recommend doing it:
- Shut off the dryer’s circuit breaker for safety. Always unplug it too.
- Detach the old vent from the dryer and wall fittings. Clean out any lint.
- Measure and cut a length of rigid metal vent hose to fit neatly between the dryer and vent.
- Attach one end to the dryer port with a clamp. Tape all seams with foil tape.
- Attach the other end to the wall fitting. Make sure it’s straight with no sags or kinks.
- Use metal straps to secure the vent 2-3 feet apart along the run. This prevents sagging over time.
- Confirm a strong airflow by running the dryer empty on high.
Taking it slow and getting all the connections secure gives you the best results. Rushing through can lead to loose fittings and air leaks.
Maintaining Peak Performance
A key to staying safe and efficient is keeping your vent hose clear. Lint can build up surprisingly fast. I recommend cleaning along the full vent run at least yearly. Remove the vent connectios and vacuum out any lint inside the hose.
Also immediately replace any vent that gets crushed or damaged. Restricted airflow is bad news for both safety and efficiency. Stay vigilant and replace vent hoses at the first sign of any wear.
Proper Vent Hoods Maximize Airflow
The exterior vent hood where the dryer exhaust terminates is easy to overlook but critical for performance. Using the right type of vent hood prevents blockages, protects from weather, and maximizes airflow.
The most common vent hoods are louvered hoods. Louvers allow airflow out while preventing backdrafts. Choose a hood with the louvers angled down to prevent rain from entering. The size should match the 4” diameter vent hose. Plastic louvered hoods are prone to damage from weather and animals. Select a galvanized steel hood for the most durable performance.
Flapper-style hoods are another option. A damper or flap inside opens when the dryer runs to allow airflow. This seals shut when the dryer turns off, preventing outdoor air, pests, and moisture from entering. Dampers can collect lint over time, so they need periodic cleaning. Make sure the flap seal is intact.
Box-style hoods fully enclose the vent pipe, providing maximum weather, bird, and rodent protection. Look for a high quality stainless steel or powder-coated aluminum box hood. Avoid plastic models. The key downside is reduced airflow from wind resistance. Only use a box-style hood if weather and pests are a major concern.
No matter the type, position the vent hood at least 12” above the ground or any outdoor surface. This prevents clogging from snow, leaves, mulch or other debris. Point the hood down to keep rain out. And ensure it has enough clearance above to fully open and maximize airflow.
Transitioning Vent Hoses Through Walls
Running a dryer’s rigid metal vent hose through walls or floors takes some careful planning. The goal is to minimize any sharp turns or tight squeezes that can trap lint.
If the cabinet space containing the dryer vent connection is recessed, use an offset rigid metal vent piece to transition the hose outside the cavity before turning up or sideways. Secure the offset piece to the dryer port and the wall framing using foil tape at every joint and seam.
When penetrating a wall, use a vent hood with a built-in damper rather than connecting directly to the vent hose. The rigid duct can’t easily turn 90 degrees coming through the wall. Cut a hole perpendicular to the wall to insert the duct. Then use a short piece of flexible metal duct to transition to the hood’s damper box. Secure it thoroughly with tape and use exterior caulk around the wall penetration to seal it.
For vent hosing running through floors, use angled rigid metal vent pieces designed to transition from horizontal to vertical. Connect the dryer vent hose to the bottom piece, securing with foil tape. Cut an opening in the floor for the top piece to penetrate into the room below. Connect it to another 90-degree elbow to orient the vent hood outside. Support the vertical section by securing to floor and ceiling joists using metal straps. Seal floor openings with caulk or insulation to prevent conditioned air loss.
Lint Accumulation Causes and Prevention
Lint buildup in dryer vents poses a significant fire hazard. It also restricts airflow, reduces efficiency, and increases drying times. There are several causes of lint accumulation to be aware of.
The vent hose surface itself attracts lint over time as moist air passes through. Lint then sticks readily to any damp surface. Long vent hose runs allow more area for lint adhesion. Any bumps, crimps or rough sections in the hose also harvest passing lint.
Moisture within the vent condenses and enables lint bonding. Leaks along the vent connections or seals allows additional moisture into the system. Proper vent pipe slopes to allow drainage helps, along with vapor-tight sealing of all joints.
Lint also builds up at any vent obstructions. Sharp turns, 90-degree elbows, and excess hood backpressure forces lint to accumulate. Proper smooth duct routing reduces such catch points. Regular vent brushing and vacuuming is key for any existing obstructions.
To prevent lint buildup, start with minimizing vent hose length and avoiding excess turns or elbows. Then use rigid metal venting taped at every seam and joint. Check for leaks or moisture ingress points to seal up. Finally, establish an annual vent inspection and cleaning routine. This reduces any fire hazard and maintains peak drying efficiency.
Signs Your Dryer Vent Needs Replacing
Several clear warning signs indicate when it’s time to replace your dryer vent hose. Being aware of these can help prevent more serious appliance issues or fire risks from developing.
Excess lint visible around the outside dryer vent is the most obvious red flag. Heavy internal lint buildup leads to some escaping outside. Lower airflow due to vent blockages also causes a visible accumulation of lint on the external vent hood surface.
Clothes taking longer than normal to dry is another clue of vent restrictions. Lint narrows the duct over time, forcing the dryer to run longer to fully dry loads. If drying times slowly increase over time, the vent likely needs cleaning or replacing.
Hot or warm sections along the vent hose mean airflow is being restricted. Feel along the full run of duct during a dryer cycle. Any significantly hotter sections indicate a partial blockage. The same issue causes noticeable heat buildup in the laundry room during drying cycles as well.
Finally, any visual damage like crushing, kinking or cracking warrants immediate vent replacement. Also replace any sections that feel loose or disconnected. Damage enables lint buildup while also choking airflow, creating a dangerous situation. Replacing damaged ducts restores unrestricted airflow.
Conclusion
Replacing dryer vent hoses is a DIY-friendly project that makes your dryer safer and more efficient. Go with rigid metal venting, take it slow, and get all fittings secure. And remember to periodically clean and inspect it to get the best performance. Follow these tips and you can get many more years of service from your clothes dryer.
FAQ
Q: How often should I replace my dryer vent hose?
A: It’s best to replace vinyl or foil vent hoses every 2-4 years. Rigid metal vents can last 5-10 years or more with proper maintenance. Replace immediately if any portion gets crushed or damaged.
Q: Can I use a clothes dryer without a vent hose?
A: Absolutely not! Venting the hot moist air outdoors is crucial for safety and proper drying. Operating a dryer without a vent is a serious fire hazard.
Q: Does vent hose length matter?
A: Yes. Longer vent runs allow more lint to accumulate and reduce airflow. Keep the vent hose as short and straight as possible, ideally under 35 feet.
Q: How do I install a vent hose if my dryer is upstairs?
A: Use rigid metal vent pieces to snake the vent downstairs and outside. Secure the joints and use straps to attach to the floor and joists. Minimize turns that can trap lint.
Q: What do I do if my vent hose is crushed or torn?
A: Immediately shut off the dryer and replace the damaged section of vent hose. Restricted airflow can allow dangerous lint buildup.